Developer Guide
Table of Contents
- Table of Contents
- Introduction
- Acknowledgements
- Setting up, getting started
- Design
- Implementation
- Documentation, logging, testing, configuration, dev-ops
-
Appendix: Requirements
- Product scope
- User stories
-
Use cases
- Use case: Edit description of an internship application
- Use case: Add an internship listing
- Use case: List all internship applications
- Use case: Delete an internship listing
- Use case: Find internship events by a desired criteria
- Use case: Find internships by desired criteria
- Use case: View all clashes of internship events
- Non-Functional Requirements
- Glossary
- Appendix: Instructions for manual testing
The Intern's Ship - Developer Guide

Introduction
Designed with internship-seeking university students in mind, The Intern’s Ship (TinS) aims to make managing internship applications fuss-free. While being optimised for use via a Command Line Interface (CLI), TinS also offers a Graphic User Interface (GUI) for visual display of data.
At its core, TinS is an internship management tool. It comes with features designed to make keeping track of their internship applications an easier and streamlined process. For example, TinS provides standardized fields for entry of an internship (e.g. Position, Company, Descrption, Events and etc.) and a search feature that finds internships based on these fields. Features such as clash, absolves user of the need to manually identify clashes between important dates.
The ultimate goal of TinS is to allow students to conveniently and efficiently manage, coordinate and keep track of your internship applications all in one place.
Objective of Developer’s Guide
The aim of the Developer’s Guide is to provide you (a potential developer!) with an overarching view of the application’s architecture and inter-dependent functions of each component. You will also read about how notable features are implemented as well as the rationales behind the implementation. Also, it will outline the project requirements, goals, and constraints so to ensure that its developers are working towards the same objectives.
Acknowledgements
- The Intern’s Ship is written in Java 11.
- The Intern’s Ship uses the following libraries: JavaFX, Jackson, Junit5, CalendarFX
- The Intern’s Ship is adapted from addressbook-level3
Setting up, getting started
Refer to the guide Setting up and getting started.
Design
.puml files used to create diagrams in this document can be found in the diagrams folder. Refer to the PlantUML Tutorial at se-edu/guides to learn how to create and edit diagrams.
Architecture

The Architecture Diagram given above explains the high-level design of the App.
Given below is a quick overview of main components and how they interact with each other.
Main components of the architecture
At the highest level, the App has two classes called Main and MainApp. They are responsible for,
- At app launch: Initializes the components in the correct sequence, and connects them up with each other.
- At shut down: Shuts down the components and invokes cleanup methods where necessary.
Commons represents a collection of classes used by multiple other components.
The rest of the App consists of four components.
-
UI: The UI of the App. -
Logic: The command executor. -
Model: Holds the data of the App in memory. -
Storage: Reads data from, and writes data to, the hard disk.
How the architecture components interact with each other
The Sequence Diagram below shows how the components interact with each other for the scenario where the user issues the command delete 1.
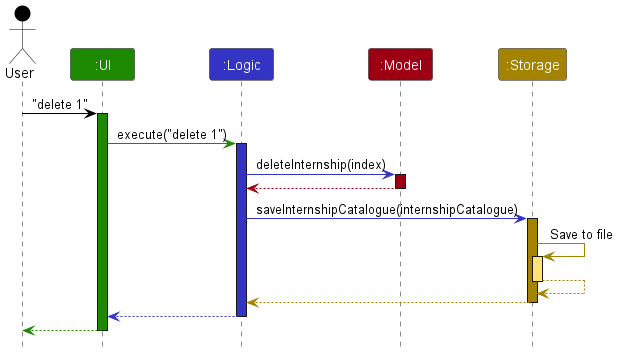
Each of the four main components (also shown in the diagram above),
- defines its API in an
interfacewith the same name as the Component. - implements its functionality using a concrete
{Component Name}Managerclass (which follows the corresponding APIinterfacementioned in the previous point ({Component Name}is a placeholder for the four main components).
For example, the Logic component defines its API in the Logic.java interface and implements its functionality using the LogicManager.java class which follows the Logic interface. Other components interact with a given component through its interface rather than the concrete class (reason: to prevent outside component’s being coupled to the implementation of a component), as illustrated in the partial Class Diagram below.

The following sections give more details of each component.
UI component
The API of this component is specified in Ui.java. The partial Class Diagram below showcases the main classes that reside in UI.

The UI consists of a MainWindow that is made up of parts, e.g. the CommandBox, ResultDisplay, InternshipListPanel, StatusBarFooter, InfoPanel etc. All these, including the MainWindow, inherit from the abstract UiPart class which captures the commonalities between classes that represent parts of the visible GUI.
The UI component uses the JavaFX UI framework. The layout of these UI parts are defined in matching .fxml files that are in the src/main/resources/view folder. For example, the layout of the MainWindow is specified in MainWindow.fxml
The UI component,
- executes user commands using the
Logiccomponent. - listens for changes to
Modeldata so that the UI can be updated with the modified data. - keeps a reference to the
Logiccomponent, because theUIrelies on theLogicto execute commands. - depends on some classes in the
Modelcomponent, as it displaysInternshipobject residing in theModel.
Page class
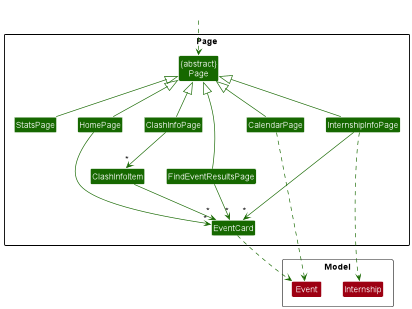
The abstract Page class represents the part of the GUI that displays information requested by the user. This may include details of an internship, existing clashes and etc. Note that a Page differs from ResultDisplay, which outputs the outcome of a command (e.g. success or failure) keyed in by the user.
Different types of information are rendered by different components, each of which is represented by their own concrete Page subclasses, such as InternshipInfoPage, ClashesInfoPage and etc.
The Class Diagram below outlines the different concrete subclasses of Page and the subcomponents they depend on.
How a Page is generated
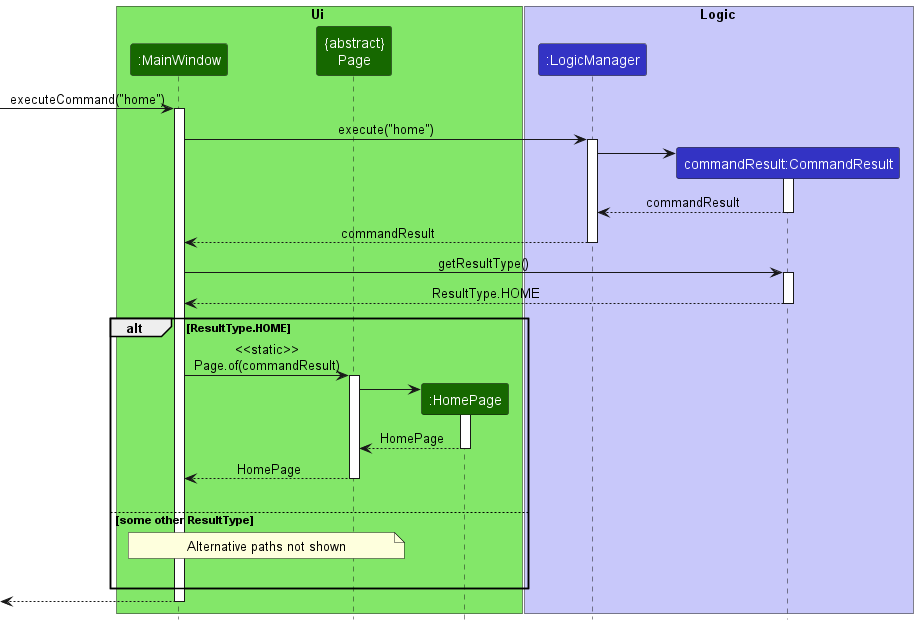
When the user executes a command, Page factory method of will be called and the result returned will be either of its concrete subclasses. The Sequence Diagram below illustrates the chain of method calls whenever a new Page is constructed to be displayed in the UI.
Logic component
API : Logic.java
Here’s a (partial) Class Diagram of the Logic component:

How the Logic component works:
- When
Logicis called upon to execute a command, it uses theInternshipCatalogueParserclass to parse the user command. - This results in a
Commandobject (more precisely, an object of one of its subclasses e.g.,AddCommand) which is executed by theLogicManager. - The command can communicate with the
Modelwhen it is executed (e.g. to add an Internship). - The result of the command execution is encapsulated as a
CommandResultobject which is returned back fromLogic.
The Sequence Diagram below illustrates the interactions within the Logic component for the execute("delete 1") API call.

DeleteCommandParser should end at the destroy marker (X) but due to a limitation of PlantUML, the lifeline reaches the end of diagram.
The partial Class Diagram below outlines classes in Logic used for parsing a user command:

How the parsing works:
- When called upon to parse a user command, the
InternshipCatalogueParserclass creates anXYZCommandParser(XYZis a placeholder for the specific command name e.g.,AddCommandParser) which uses the other classes shown above to parse the user command and create aXYZCommandobject (e.g.,AddCommand) which theInternshipCatalogueParserreturns back as aCommandobject. - All
XYZCommandParserclasses (e.g.,AddCommandParser,DeleteCommandParser, …) inherit from theParserinterface so that they can be treated similarly where possible e.g, during testing.
Model component
API : Model.java

The Model component,
- Stores independent instances of
InternshipandEventwhich represents data stored by TinS.- The
Modelcontains a catalogue for each of the two{Entity}({Entity}is a placeholder forInternshipandEvent). An{Entity}Cataloguestores the instances of{Entity}in aUnique{Entity}Listobject.
- The
- Stores currently ‘selected’
Internshipthat results from aselectcommand - Stores (e.g. results of a find query) as a separate filtered list which is exposed to outsiders as an unmodifiable
ObservableList{Entity}that can be ‘observed’ e.g. the UI can be bound to this list so that the UI automatically updates when the data in the list change. - Stores a
UserPrefobject that represents the user’s preferences. This is exposed to the outside as aReadOnlyUserPrefobjects.
Relationship Between Internship and Event entities
Events cannot exist without its corresponding internship, thus there exists a composite relationship between the two. Also, to make insertions and deletions of events easier, each event instance stores the internship instance it is associated with. Due to this, extra precautions are taken during internship deletions, making sure the corresponding events are deleted as well.
![]()
Storage component
API : Storage.java

The Storage component,
- can save internship catalogue data, event catalogue data and user preference data in json format, and read them back into corresponding objects.
- inherits from both
InternshipCatalogueStorage,EventCatalogueStorageandUserPrefStorage, which means it can be treated as either one (if only the functionality of only one is needed). - depends on some classes in the
Modelcomponent (because theStoragecomponent’s job is to save/retrieve objects that belong to theModel)
Common classes
Classes used by multiple components are in the seedu.internship.commons package.
Implementation
The following section describes some noteworthy details on how certain features are implemented.
Selecting an Internship: select command
Purpose of select command
In TinS, for all Internship-related commands (e.g. add, event add, delete and etc.), the user has to select an existing Internship as the target of the command. This selection action is done through the select command.
Implementation
The select command is a standard command that extends Command and returns a CommandResult in the execute() method, which does the following:
- Update
currentInternshipfield inInternshipCataloguewhich stores the current selectedInternshipfor use in other commands. - Obtains a list of all the
Eventbelonging to thatInternship. - Returns a
CommandResultcontaining theInternshipand its list ofEvent, to be passed to the UI for display.
Given below is an example usage scenario and how the select command behaves at each step.
Step 1. The user enters the select command into the CLI: select 2.
Step 2. InternshipCatalogueParser parses the input and extracts the command select, creating a SelectCommandParser and passing it "2" by calling its parser() method.
Step 3. SelectCommandParser parses the index 2 of the selected internship and creates a SelectCommand instance with that index and returns it up to LogicManager.
Step 4. LogicManager calls the execute() method of the SelectCommand instance, which invokes getFilteredInternshipList() on Model to get a list of internships, and obtains the internship at index 2.
Step 5. SelectCommand then passes that Internship instance through updateSelectedInternship() on Model which invokes updateCurrent() on InternshipCatalogue which updates its currentInternship field to that instance of Internship.
Step 6. SelectCommand also invokes updateFilteredEventList() and getFilteredEventList() on Model to obtain the list of Event belonging to that instance of Internship as ObservableList<Event>.
Step 7. Finally, a CommandResult is created containing that Internship and its ObservableList<Event> and it is returned to LogicManager for use in the UI.
The following Sequence Diagram shows how the select command works:
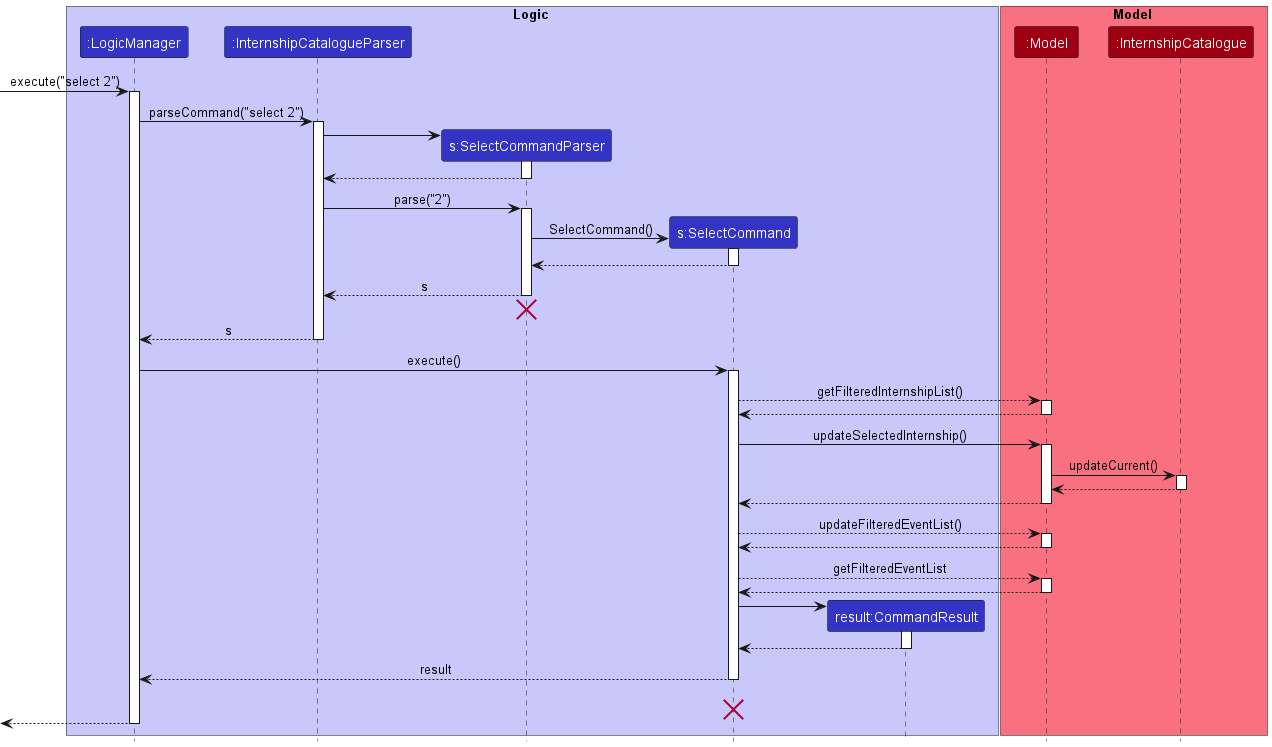
Note: The lifeline for SelectCommand should end at the destroy marker(X) but due to a limitation of PlantUML, the
lifeline reaches the end of diagram.
Adding Event to an Internship: event add command
Purpose of event add command
An Internship may contain 1 or more Event. Some examples of Event include interviews, deadline for submissions and etc. The event add command allows users to add instances of Event to a selected Internship.
Implementation
event add command is a Event-related command that extends Command and returns a CommandResult in the execute() method. Event-related command refers to 2-word commands that has event as the first word. These commands are additionally parsed by EventCatalogueParser after being parsed by InternshipCatalogueParser.
Below is an example usage of event add.
Step 1. User selects the Internship they want to add the event to by executing select <id>, where <id> refers to the index of the Internship on the list.
Step 2. User executes event add na/<event name> st/<event start datetime> en/<event end datetime> de/<event description> if they want to add an Event to the selected Internship.
- User executes
event add na/<event name> en/<event end datetime> de/<event description>instead if they want to add a deadline to their selected internship. A deadline is simply anEventwith only the end date.
The Activity Diagram for the above logic flow is below:
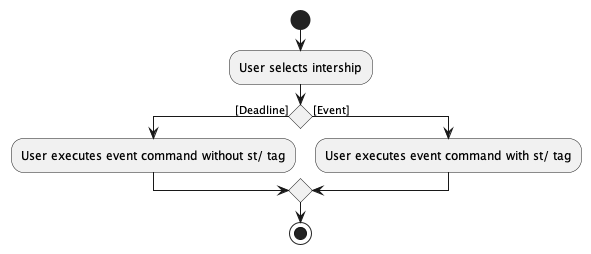
Step 3. UI sends the Command to Logic#InternshipCatalogueParser , which uses the keyword event to identify this as an Event-related command and sends the remainder of the command (i.e. ` add na/… ) to Logic#EventCatalogueParser`
Step 4. EventCatalogueParser identifies the add event command using the keyword add, then calls the EventAddCommandParser passing the arguments (everything except the keyword and) to be parsed.
Step 5. EventAddCommandParser tokenizes the arguments and creates an Event Object , which is then passed into a ` new EventAddCommand(event) instance and the instance is returned by EventAddCommandParser`.
Step 6. Then LogicManager passes the current model instance to execute method of EventAddCommand instance.
Step 7. EventAddCommand instance uses the model object to find the selectedInternship and passes it to the Event object to initialise the internship variable inside the Event object.
Step 8. Event object is then added to the UniqueEventList using the addEvent method of model.
The Sequence Diagram for the adding the Event is below:
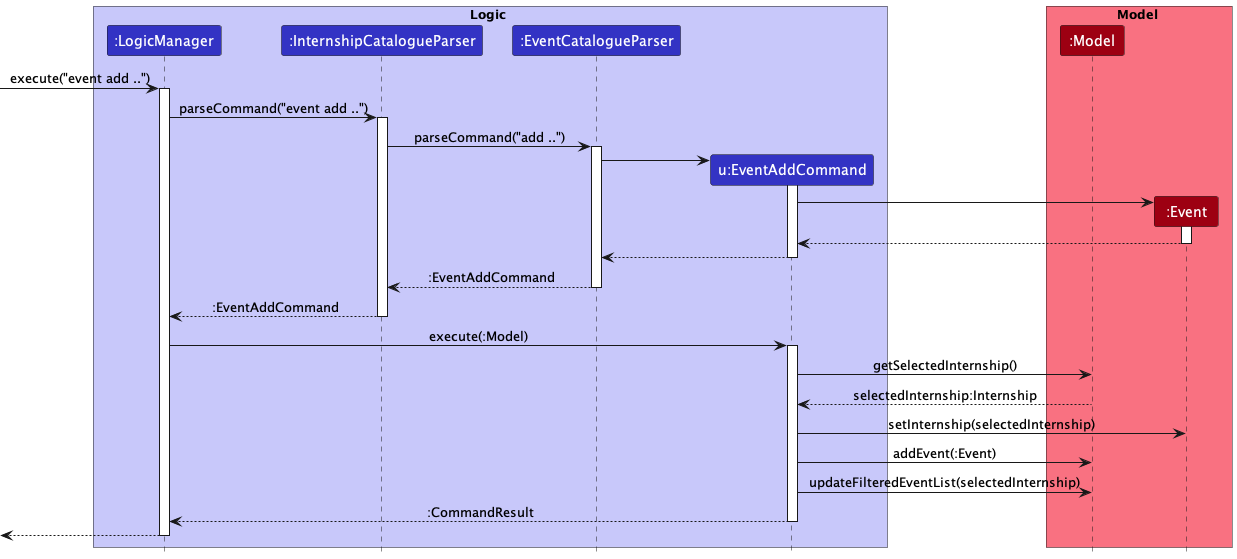
Viewing all Event on a calendar: calendar command
Purpose of calendar command
The calendar command displays all Events under existing Internships in a calendar rendered by third-party JavaFX library CalendarFX.
Implementation
The calendar command is a standard command that extends Command and returns a CommandResult in the execute() method.
Given below is an example usage, and a trace-through of the execution of calendar command.
Step 1. The user enters calendar command into the CommandBox.
Step 2. MainWindow receives the input and calls execute('calendar'). execute(String) is a method declared in LogicManager.
Step 3. InternshipCatalogueParser parses the input and extracts the command String calendar. A CalendarCommand is then created.
Step 4. LogicManager calls execute(Model) method of the CalendarCommand. The argument is a Model instance stored in LogicManager.
Step 5. In the method execute, updateFilteredEventList(Predicate) of the Model instance is called. PREDICATE_SHOW_ALL_EVENTS, which is a Predicate that evaluates to true for all Event is passed as argument. As a result, the Model now maintains an ObservableList of all Event instances from all existing Internship.
Step 6. The execute method creates a CommandResult that encapsulates the ObservableList of all Events. The CommandResult is passed to LogicManager and subsequently back to MainWindow for the GUI to display.
Step 7. In MainWindow’s executeCommand method, Page.of(CommandResult) is called to create a Page to show on the UI.
Step 8. Page.of(CommandResult) recognizes that ResultType of the CommandResult is CALENDAR, and creates a CalendarPage to be shown by calling its constructor. THe ObservableList of Event is passed to the constructor.
Step 9. Within constructor of the CalendarPage:
- A
MonthPageis created. It is a composite CalendarFX control responsible for displaying allEventin a month in grids. - The
MonthPageis initialized with the current time and set up such that it updates its timing accordingly. - A
Calendaris created. It is a CalendarFX class that stores ourEventin the form ofEntry(another CalendarFX class you will see again in a later step) - The
MonthPageis connected to theCalendarthrough a wrapper class calledCalendarSource. This is to allow theMonthPageto show the events inCalendar.
Step 10. Now, we will add each Event in the ObservableList of Event received by the CalendarPage constructor earlier to Calendar, each as an Entry.
-
Entryis a CalendarFX class that represents an event in theCalendar. If theEventis a deadline, then theEntrywill be set as a full-dayEntrywithsetFullDay(true).
Step 11. The CalendarPage is constructed and now returned to the MainWindow, where it will be added as a children of pagePlaceholder for display on the GUI.
Step 8 till Step 11 are depicted in the Sequence Diagram below.
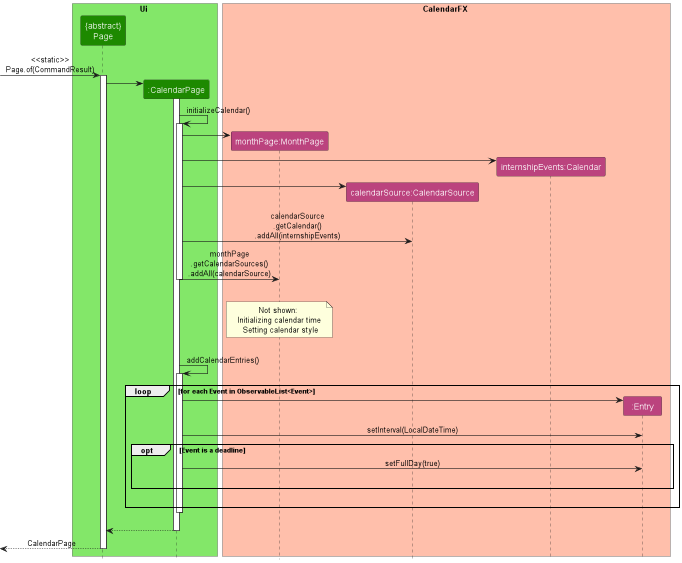
To learn more about CalendarFX, you may visit its Developer Guide here.
View useful statistics: stats command
Purpose of stats command
The stats command displays useful statistics based on Internship and Event data.
Design considerations:
Aspect: How statistics are generated and used:
-
Alternative 1 (current choice): Separate
Statisticsclass.Statisticsparses lists ofInternshipandEventto create specifiedDatapointfields. TheStatisticsis then passed into theCommandResult.- Pros: Allows for easy expansion for more kinds of statistics to be shown by adding more
Datapointfields inStatistics. - Cons: Difficult to implement.
- Pros: Allows for easy expansion for more kinds of statistics to be shown by adding more
-
Alternative 2:
StatsCommandparses the lists ofInternshipandEventto create list ofDatapoint. The list ofDatapointis then passed intoCommandResult.- Pros: Easy to implement.
- Cons: Difficult to expand to add more kinds of statistics.
Implementation
The stats command is a standard command that extends Comand and returns a CommandResult in the execute() methods, which does the following:
- Obtains a
ObservableList<Event>andObservableList<Internship>fromModel, which are lists containing allEventsandInternships. - Creates a
Statisticsobject from those 2 lists. - Returns a
CommandResultofResultType.STATScontaining theStatistcsobject, to be passed to the UI for displaying.
Given below is an example usage scenario and how the stats command behaves at each step.
Step 1. The user enters the stats command into the CLI: stats.
Step 2. InternshipCatalogueParser parses the input and extracts the command select, creating a StatsCommand and passes it to LogicManager
Step 3. LogicManager calls the execute() method of the StatSCommand instance, which invokes getFilteredInternshipList() and getFilteredEventList() on Model to get a list of internships and events.
Step 4. A Statistics object is created from the 2 lists. Which parses the list of Internship and Event to instantiate the appropriate Datapoint fields.
Step 5. Finally, a CommandResult is created containing that Statistics instance, which is then returned to LogicManager for use in the UI.
The following sequence diagram shows how the stats command works:
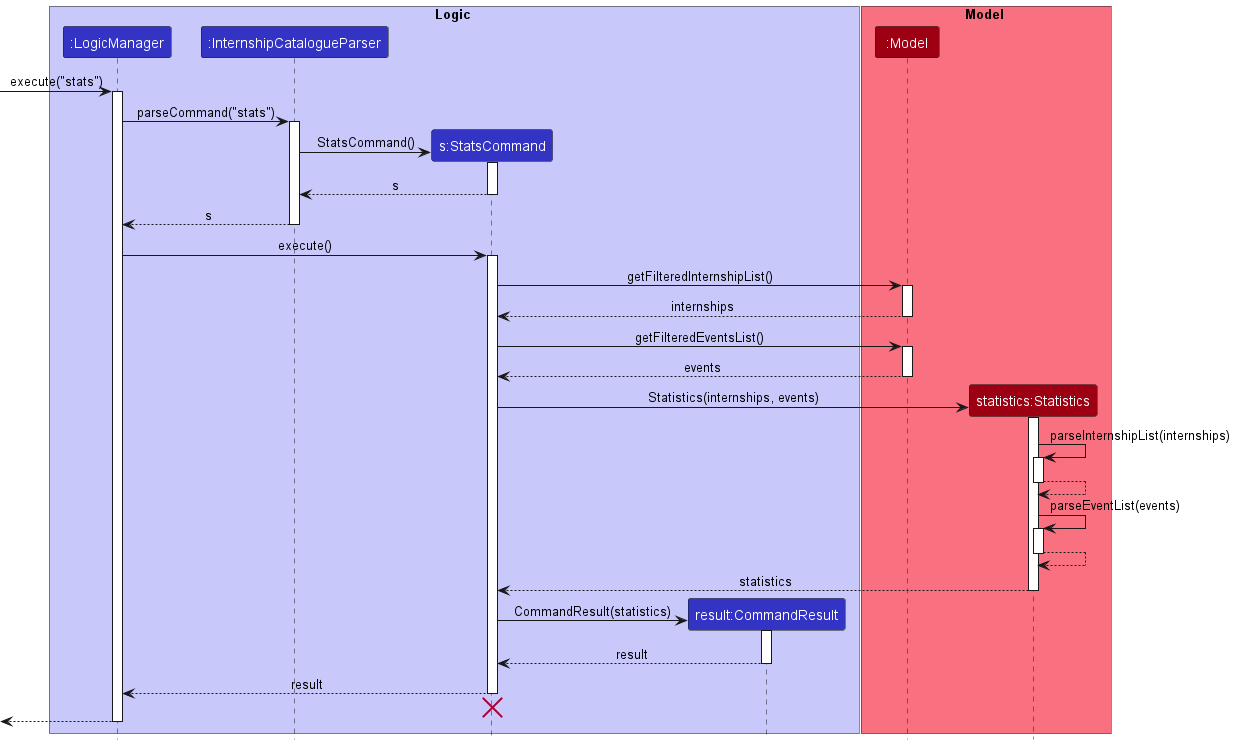
View all clashing event: clash command
Purpose of clash command
The purpose of the clash command is for users to find events with clashing timings, enabling them to reschedule
clashing events.
In TinS, there are two kinds of events: Interviews and Deadlines. Having multiple Deadlines with the same timing
does not result in a clash. However, having multiple Interviews with overlapping timings would result in a clash in
timing. Therefore, Interviews with overlapping timing would need to be picked up by the clash function.
Design considerations:
Aspect: How statistics are generated and used:
There were two possible ways of implementing the clash function:
-
Alternative 1: Organising clash timing by Events: For each Event, event, stored in TinS, TinS will compare that particular Event will all other Events, otherEvents. If there is a clash found, the otherEvent will be placed in a list. After comparison with all other Events, the event and its corresponding list will be added to a hash map. This is repeated for all Events in TinS.
Advantage:
- Implementation is easy.
Disadvantage:
- Duplicated records of clashes. For example, if event 1 clashes in timing with event 2, event 2 will be recorded in the list corresponding to event 1, and event 1 will be recorded in the list corresponding to event 2. This results in two records of the same clash.
-
Alternative 2 (current choice): Organising clash timings by Date: For each day, list out all the Events with clashes in timing on that day.
Advantage:
- No duplicated records of clashes.
- Neater display of clashes.
Disadvantage:
- User will not be able to see exactly which two events have clashing timings on a day, but rather a collated list of all events that clash in timing.
The team has decided to proceed with the second implementation. This is because the team rationalized that organising the clash events by date will make the application more easy to understand, as there will be no confusion caused by duplicated records.
Implementation
The clash command feature is standard command that extends Command and returns a CommandResult in the
execute() method. The CommandResult returns a HashMap, which contains mapping from a LocalDate to List<Event>.
The List<Event> is the list of events with clashes on that particular date.
Given below is an example usage scenario and how the select command behaves at each step.
Step 1. The user enters the clash command into the CLI.
Step 2. InternshipCatalogueParser parses the input and extracts the command clash, and creates a new ClashCommand.
Step 3. LogicManager calls the execute() method of the ClashCommand instance, which invokes getEventCatalogue()
on Model to get the current Event Catalogue of TinS.
Step 4. The findClashEvents() is then called on eventCatalogue field in EventCatalogue. To avoid breaking the
abstraction barrier, getEventClashHash() is called on events field in UniqueEventList.
Step 5. The getEventClashHash() methods creates a list of Interview events from the current list of events in
internalList, by filtering out Deadline events.
Step 6. For each event in the list of Interview events, getEventClashHash() compares the event with all other events
in the list. If there is a clash in the two events, clashingTimings(Event) is invoked on the event to find all the
dates on which the events clash. These dates are added to the HashMap, and the clashing events are appended to
the list of events corresponding to those dates.
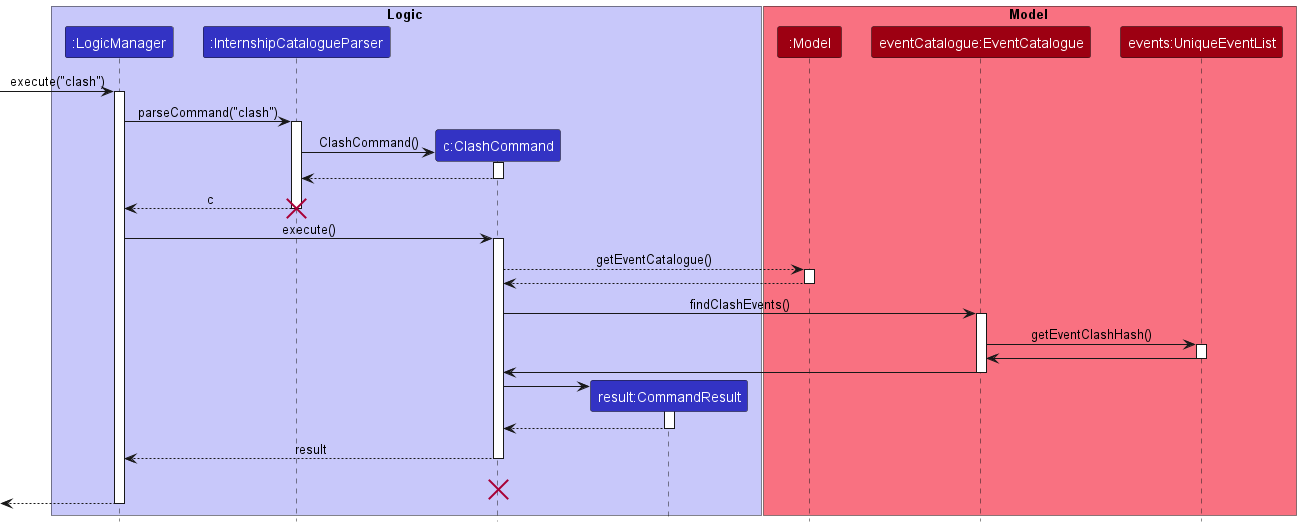
Documentation, logging, testing, configuration, dev-ops
Appendix: Requirements
Product scope
Target user profile:
- has a need to manage a significant number of internships applications from different hiring websites
- prefer desktop apps over other types
- can type fast
- prefers typing to mouse interactions
- is reasonably comfortable using CLI apps
Value proposition: manage internship applications faster than a typical mouse/GUI driven app.
User stories
Priorities: High (must have) - * * *, Medium (nice to have) - * *, Low (unlikely to have) - *
| Priority | As a … | I want to … | So that I can… |
|---|---|---|---|
* * * |
new user | see usage instructions | refer to instructions when I forget how to use the App |
* * * |
beginner user | add a new internship listing | record details of my internship application |
* * * |
beginner user | delete a previously added internship listing | rid of dummy data or unwanted internship application |
* * |
user | hide internship descriptions unless selected. | minimize chance of someone else seeing them by accident |
* * |
novice user | edit existing internship applications | update outdated information or add new details |
* |
intermediate user | quickly update the status of an internship | keep the status of my applications up to date |
* * |
expert user | see all internship events that have clashes in dates | try to reschedule some of those events |
* * * |
novice user | list all my intership applications easily | can confirm that my internship listing has been created |
* * |
intermediate user | list all internship events that have deadlines on a particular date | avoid scheduling an interview on that day |
* * * |
intermediate user | view my list of internships sorted by my desired criteria/field (e.g. status, deadline, interview date) | easily look up internships that I am concerned about |
Use cases
(For all use cases below, the System is TinS)
Use case: Edit description of an internship application
MSS
- User requests to list all internship applications.
- System shows a list of all internship applications.
- User specifies the ID of the internship application he wishes to edit.
- System shows current description of the internship application and prompts user to input a new description to replace it.
- User inputs the new description of the internship application.
- System updates the internship application with the new details.
Use Case ends.
Extensions
-
3a. The specified ID is invalid.
- 3a1. System shows an error message.
-
5a. User cancels the operation midway.
-
5a1. System retains the original description and does not edit the internship application.
Use case ends.
-
-
5b. User inputs invalid description.
- 5b1. System shows an error message.
-
5b2. System retains the original description and does not edit the internship application.
Use case resumes at step 4.
Use case: Add an internship listing
MSS
- User requests to add an internship and provides details of the internship (i.e. position, company, application status, description and tag).
- System adds the internship listing.
Use Case ends.
Extensions
-
1a User inputs invalid parameter.
- 1a1. System shows an error message.
Use case: List all internship applications
MSS
- User requests to list all internship applications saved on System.
- System displays a list of internships.
Use case ends.
Extensions
-
2a. The list is empty.
Use Case ends.
Use case: Delete an internship listing
MSS
- User requests to list internship applications saved on system.
- System shows a list all the internship applications saved on system.
- User requests to delete an internship listing by its index.
- System deletes the internship listing.
Use case ends.
Extensions
- 3a. User enters an invalid ID.
-
3a1. System will show an error message and not delete any listing.
Use Case resumes at Step 3
-
Use case: Find internship events by a desired criteria
MSS
- User requests to find events by a desired criteria (i.e. event title, start timing and end timing).
- System displays the list of events that fulfills the criteria specified.
Use case ends.
Extensions
-
1a. The date given by user is invalid (i.e. not formatted correctly).
- 1a1. System displays an error message to inform the user that the input date is not valid.
-
2a. There are no internship events fulfilling specified criteria.
Use case ends.
Use case: Find internships by desired criteria
MSS
- User requests to find internships by desired criteria.
- System prompts user to choose a criteria to list internship by.
- User inputs desired criteria.
- System displays list of all internships sorted in order based on chosen criteria.
Extensions
-
1a. The list is empty.
Use case ends.
-
3a. The given criteria is invalid.
- 3a1. TinS shows an error message.
Use case: View all clashes of internship events
MSS
- User requests to view all clashes of internship event dates.
-
TinS shows a list of dates that have clashes and the events that clashed.
Use case ends.
Extensions
-
2a. There are no event clashes.
Use case ends.
Non-Functional Requirements
- Should work on any mainstream OS as long as it has Java
11or above installed. - Should be able to hold up to 1000 internships without a noticeable sluggishness in performance for typical usage.
- A user with above average typing speed for regular English text (i.e. not code, not system admin commands) should be able to accomplish most of the tasks faster using commands than using the mouse.
- A user should be able to navigate the application solely using the keyboard (i.e. input new internships, scroll through internship listing via keyboard).
Glossary
- CLI: A command-line interface (CLI) is a text based user interface to run programs.
- ID: This is a key to uniquely identify each internship. It is auto-generated by TinS based on position and company name.
- Status: This refers to the status of application.
- Position: The name of the internship position/role.
- Company: This refers to the hiring company for any internship.
- Description: Additional details about the internship. For example, contact details of hiring manager, link to internship webpage, requirements of internship)
-
Event: Represents a Deadline or an Interview associated to an Internship.
- Deadline: An Event that only has an end timing (E.g. Internship Application Submission Deadline, Offer Acceptance Deadline)
- Interview: An Event that has both a start and end timing (E.g. Interview, Online Assessments)
Appendix: Instructions for manual testing
Given below are instructions to test the app manually.
Launch and shutdown
-
Initial launch
-
Download the jar file and copy into an empty folder
-
Double-click the jar file Expected: Shows the GUI with a set of sample internships. The window size may not be optimum.
-
-
Saving window preferences
-
Resize the window to an optimum size. Move the window to a different location. Close the window.
-
Re-launch the app by double-clicking the jar file.
Expected: The most recent window size and location is retained.
-
Deleting an Internship
-
Deleting an internship while all internships are being shown
-
Prerequisites: List all internships using the
listcommand. Multiple internships in the list. -
Test case:
delete 1
Expected: First internship is deleted from the list. Details of the deleted internship shown in the status message. -
Test case:
delete 0
Expected: No internship is deleted. Error details shown in the status message. Status bar remains the same. -
Other incorrect delete commands to try:
delete,delete x,...(where x is larger than the list size)
Expected: Similar to previous.
-